
EssentialPIM 11.1 through 11.1.6 have been released and many of the features are described in the announcement on the website's news page. Some deserve a closer look, which we'll do in this post.
Settings for quick search saved on exit
The quick search box in the Main Toolbar includes an option to define where to search, and this scope changes from module to module. For instance, the range in Notes is: All fields, titles, note content and tags. (Figure 1)
Prior versions of EssentialPIM reset the scope to the default (all fields) when you exited. The new version keeps your selections from session to session.

Figure 1. Examples of the scope in the quick search box in the Main Toolbar.
A new look for anchors
Anchors take on a new look that you can control. Figure 2 compares the prior default with a customized anchor in EPIM 11.1. Settings for anchors are in Tools > Options > Notes, Anchor line properties (Figure 3).
Be aware this is a global setting; EPIM applies the color and length you choose to all anchors.
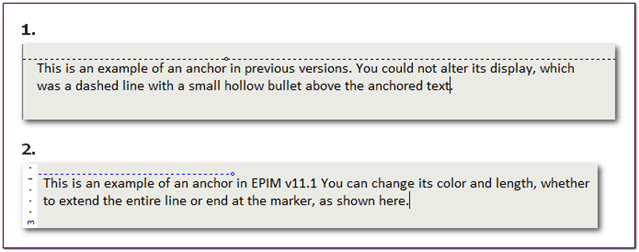
Figure 2. Anchors had one look in prior versions of EPIM (#1). Now you can adjust the length and color of the anchor (#2).
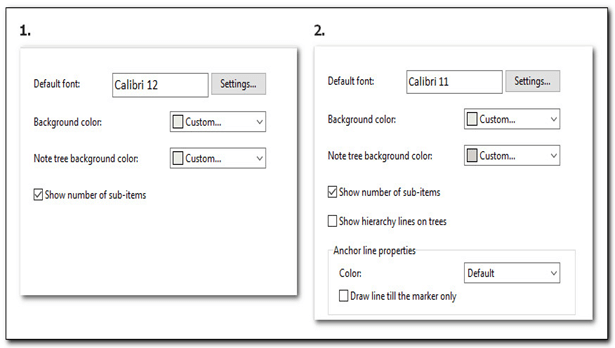
Figure 3. The new array of settings for Notes, including options for anchors.
A new look when dropping files in EPIM
EPIM 11.1 introduces a visual presentation for importing files when dragging and dropping them (Figure 4). This applies not only to Notes but also to the text boxes in the other modules. Previously, EPIM brought up the prompt to add the file as an attachment or link (except for images in Notes, which EPIM inserted automatically inline with text. This means you have a new option for how to insert images when dropping into Notes.).
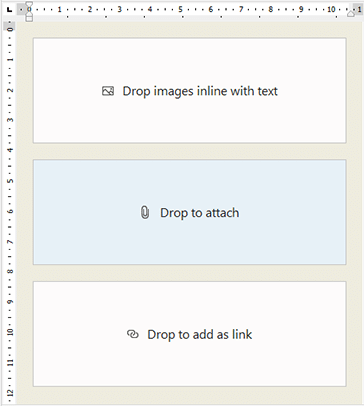
Figure 4. The new visual presentation when dragging files into EPIM. You will see this in Notes and text boxes across all modules.
Rulers let you control more formatting
The introduction of rulers in Notes brings a shortcut and visual aid for adjusting margins. On the horizontal ruler, you can set left and right margins, adjust indentation, and also choose and set three types of tabs: left, center, and right. The vertical ruler supports changing the top margin. Toggle the rulers' display through the menu, View > Ruler.
Tabs by default are left aligned at half-inch stops. To change this:
- Determine the kind of tab you want by clicking through the types in the tab selector box (Figure 5, #1).
- Set the tab by clicking on the ruler (Figure 5, #2).
- Click and drag a tab on the ruler to change its location.
- Click and drag a tab off the ruler to remove it.
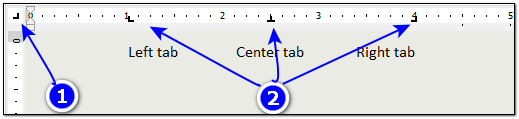
Figure 5. Options for setting tabs in Notes via the new ruler.
In Figure 6, the blue arrows show how content aligns with the margins and red arrows show content aligned with the indentation selectors. The selectors make it easy to indent paragraphs or to set hanging indentations.
The margins affect the entire document, whereas indentation applies to paragraphs.
Apart from displaying the ruler via the View menu, there are no menu options for the ruler. Setting tabs and margins are controlled on the ruler. Indentation can also be set either through the toolbar icons  or the paragraph settings (right click > paragraph).
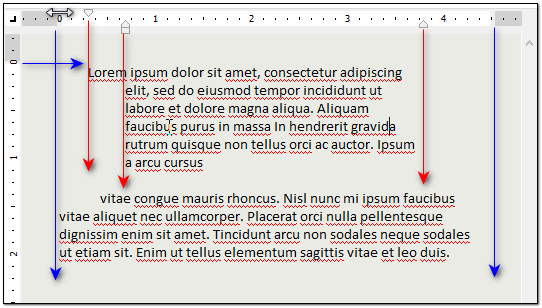
Figure 6. Sample setting for margin and indentation selectors.
The global sidebar becomes more flexible
The global sidebar works differently in EPIM 11.1. Your options are still to display Tasks or the Calendar—or both—but you can decide which appears at the top simply by selecting it first. When both are displayed, you can resize each by dragging the panel's top or bottom margin up or down. Previously, the display was locked and you couldn't resize the panels.
You can also control the width of the sidebar by dragging its left border left or right. Dragging the border all the way to the right no longer turns the sidebar off. Close buttons in the upper right of Tasks and Calendar replace this function (Figure 7).
The calendar panel has also been enhanced to show events for the next seven days from the date selected in the sidebar's calendar. This includes tasks you have chosen to show in the calendar. To hide these, click on the bottom margin of the calendar (see the circled mouse icon in Figure 7) and drag it down until they disappear.
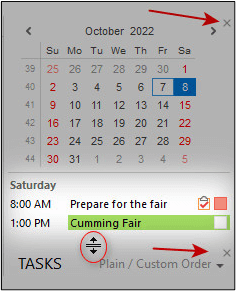
Figure 7. EPIM 11.1 adds close buttons at the upper right of the Calendar and Tasks in the sidebar. Upcoming events show below the calendar.