Appointments can be edited by double-clicking on them.

Start - sets the start time.
End - sets the end time.

The chain icon, located between the start and end dates, provides the option to preserve the duration when editing the dates or to edit the dates independently.
Duration - automatically shows the duration of an appointment, can be edited manually.
All day event - an event for one or more days that has no start and end times.
Subject - name of the appointment.
Calendar - allows to set where the appointment should be created.
Location - location for the appointment. Locations are saved and available for future use from the drop-down list. You can add, edit or delete locations using this menu. To do so, click on the Manage Locations option at the end of the list.

When typing into the Location field, it automatically suggests geographic locations according to input.

Category - sets a category for an appointment. You can create custom categories by selecting the Manage categories option in the drop-down list. For more details, please refer to the Custom categories topic.
Completion - sets a percentage of completion.
Invite participants - this feature enables the invitation of participants to the appointment. For more details, refer to the Meeting invites topic.
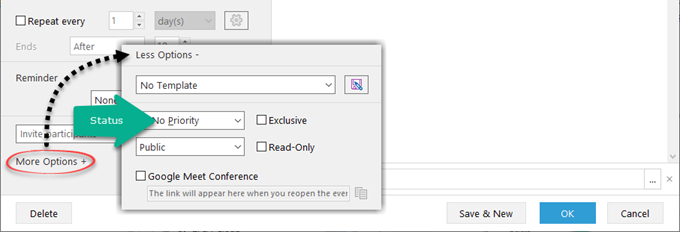
More Options - expands the options panel to display additional event settings.
Templates - enables the creation of templates for future use. For more details, refer here.
Status - allows you to set private or public statuses for events. Also used in EssentialPIM Pro Business for assigning items to other users. More details here.
Priority - allows you to set a priority.
Read-Only - makes an item read only, preventing it from being edited.
Exclusive appointment - such appointments cannot be overlapped with other events.
Google Meet Conference - enabling this option allows the creation of a Google conference. For more details, see here.
Related Items - shows items that have links to the current appointment.
Tags - allows to add tags. More details about working with tags are here.
|
Some properties such as Category, Priority, Status or Completion can be altered by right clicking on the appointment in one of the Calendar views or from the Edit menu at the top. |
Enable a reminder by clicking on the Reminder drop-down menu and select the necessary value:

Selecting "0 min" creates a reminder that triggers at event time, others create a reminder before the event.
Click on Add Reminder adds additional reminders to the event.

To delete an additional reminder, click on the cross icon. If there's just a single reminder, disable it by choosing the None option.
Additional reminder options can be set by clicking on the Advanced button:

You may choose a Default sound or any custom Sound file (*.wav or *.mp3) for alerts.
Message field allows you to set a Custom message for the reminder.
You can also assign a program that will run with the reminder. Click on the Browse button and choose the desired app.
Repeat Appointment
Make a recurring appointment by enabling the Repeat every checkbox:

You can set daily, weekly, or monthly recurrences. By default an event will expire after 10 occurrences. Adjust the number or change the expiry date, if needed. For more complex recurrence patterns, click the Advanced button:

This dialog allows you to tune recurrence patterns, i.e. you can choose to repeat an appointment every second Tuesday every three months.
|
For the "No end date" option, EssentialPIM will create a limited number of appointments (usually good enough for 20-30 years) in order not to compromise database performance. |

Templates enable you to save predefined patterns of appointments for future use. To create a template, open a new or existing appointment and fill in all the desired fields. Then, expand the More Options section and click the Save button next to the templates drop-down menu. A dialog window will appear, allowing you to name your template.

Save start time - adds the start time of an appointment to the template, allowing you to easily create events that begin at the saved time on any selected date.
Save duration - includes the duration in the template, automatically calculating the end date and time based on the start date and duration.
Set as default - marks the saved template as the default option for creating new events.
Once an appointment is saved as a template, it becomes available from the templates drop-down list. Click on the drop-down list and select a template to load it. Manage Templates calls a dialog where you can re-order templates, edit their names (simply by clicking on them) and select a default template.

Move Up/Down and Delete buttons allow you to adjust the order of templates in the drop-down list and delete unused ones.
Set/Unset Default buttons allow you to set a default template for all new appointments.