
We reviewed in a previous post several enhancements that EssentialPIM v11.2 introduced in Mail. Here, we'll look at other changes EPIM 11.2 has brought.
Arrange module toolbars the way you want
Aware that users like to control how their work area looks, the EPIM team added more tools for customizing. These include the main toolbar in each module, the display of completed items, and restoring the shortcut (Ctrl+D) for a consolidated view of tasks across lists.
Each toolbar has two sections, primary and secondary (Figure 1), where users can decide which functions to display and how to arrange them. You can hide functions, move them between the primary and secondary segments, and suppress the button labels for an even more compressed look.
To customize a module's toolbar, right-click on it, then click on the "Customize the Toolbar" button.
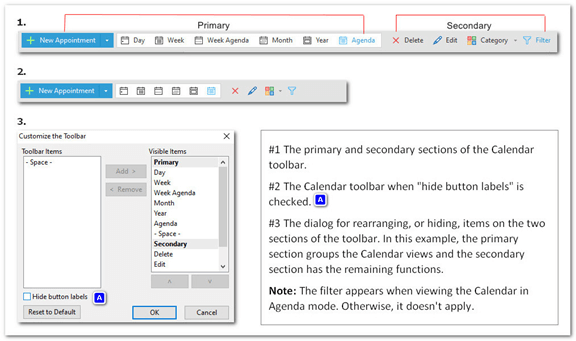
Figure 1. EPIM 11.2 introduces customizing the main toolbar in each module. This figure displays the Calendar toolbar.
Strike through completed items—or not
Events and tasks that are complete stand out from the rest with four visual cues (Figure 2, #2):
- The status becomes 100% complete;
- The text turns gray;
- A line strikes through the item, and
- Its checkbox is checked.
At the request of users, EPIM has made the strike-through optional. To customize this, go to Tools > Options and check the option "Do not strike through completed items" for the Tasks and Calendar modules (Figure 3). You can also hide completed items altogether with the shortcut, Ctrl+H.
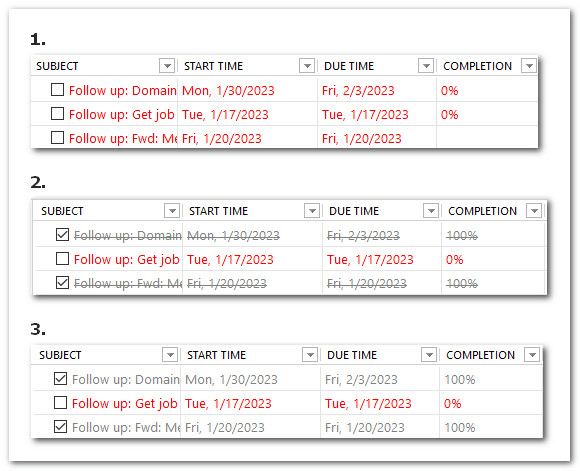
Figure 2. By default, EPIM strikes through tasks and events when you mark them complete (#2). Now you can suppress the strike-through (#3).
The dialog for options sports a fresh look
In addition to various customizations, the EPIM team refreshed the appearance of the Options dialog. Figure 3 compares Calendar options in the new look (bottom) with the previous version. It also shows three new functions:
- Do not strike through completed events;
- Set a default reminder for new events;
- Access EPIM logs quickly via the link. This makes responding to the support team easier when they request logs to help them troubleshoot reported defects.

Figure 3. The Options dialog (Tools > Options) has a new look (bottom) compared to prior versions (top). There are also new functions, such as setting a default reminder for events (#2) and quick access to EPIM logs (#3).
Accounts added to the Tasks hierarchy
EPIM 11.2 introduces a new hierarchy for grouping tasks. Previously, lists appeared in tabs above the panels for Notes, Attachments, and Related Items (Figure 4, #1). Now, task lists are associated with accounts that display on the Navigation pane, similar to Calendar accounts (Figure 4, #2).
In Figure 4, I have two lists under the account for Local Tasks: Follow Up and Personal. These are tasks that I create in this database and comprise the Local Tasks account. Follow Up contains links to email messages that I want to handle later. (EPIM creates a task automatically for flagged messages.)
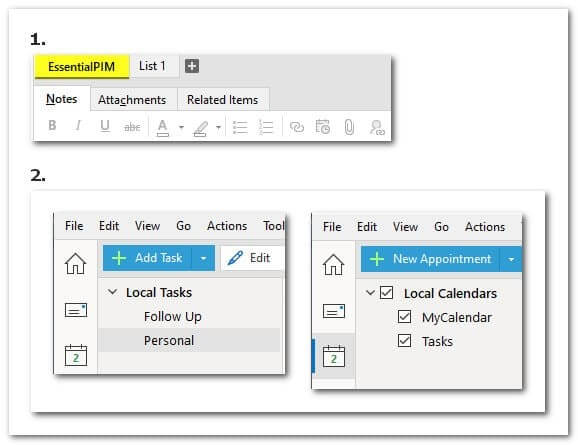
Figure 4. Lists of tasks no longer appear as tabs (#1) but under accounts in the Navigation pane (#2).
There are two ways to create a new list: Click on Actions > New list, or right-click in the Navigation pane and click Add. This brings up the dialog in Figure 5, where you can name and assign the list to an account.
To delete an account, first delete each list in that account. EPIM will remove the account from Tasks when you delete its last list.
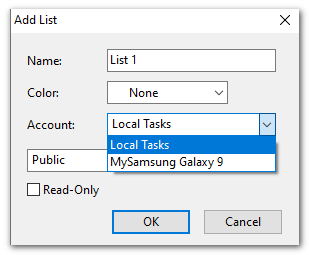
Figure 5. The dialog for adding a Task list and assigning it to an account.
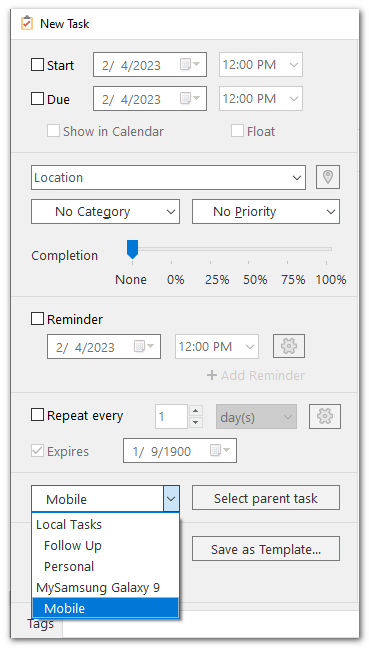
Figure 6. You can choose the account and list when you create a task.
Keep tasks in a consistent order
If you like your tasks arranged a certain way, the sidebar can arrange them in the same order as the main Tasks window. See Figure 7 for how to access this feature.
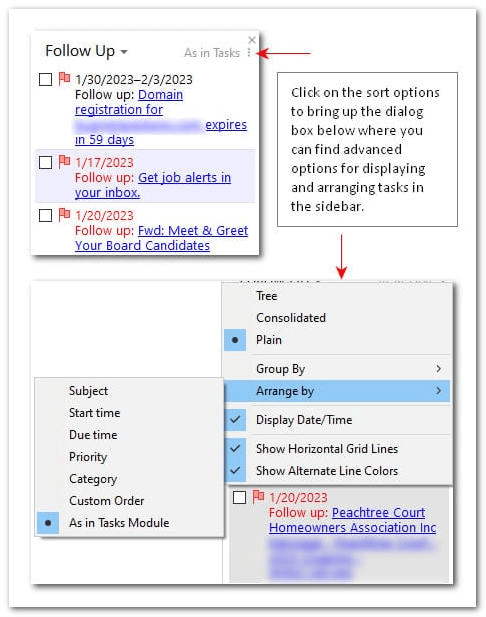
Figure 7. A new option provides a consistent arrangement of tasks between the sidebar and the main Tasks window.
More precise weather
The weather provider for the Calendar module remains the Norwegian Meteorological Institute, but a new feature provides more precise weather by prioritizing the local weather service (Figure 8). To see the 10-day forecast in the Calendar, go to Tools > Options > Calendar > Weather.
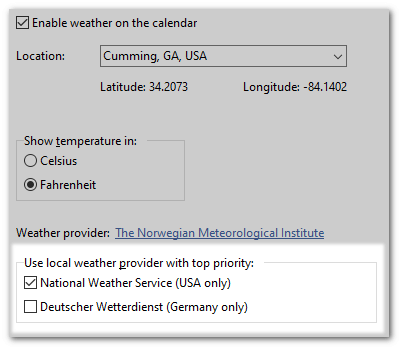
Figure 8. New weather services available in options for the Calendar module.